ASP.NET 4.0 新特性--Web.Config Transformation(原创)
Web.Config Transformation详解,这部分内容比较简单,关键是用没有用过的问题,所以这里希望帮助大家实践一下。
一 概述:
在VS2010中引入在Config 文件中使用XML DOCUMENT TRANSFORM,这一个特性就是帮助你Web.config能方便的从部署配置文件转化到产品配置文件。协助Web.Config Transformation这两个功能就是web.debug.config, web.release.config等.这些文件的最后都会匹配到MSBuild中的配置文件去。
其实是在web.debug.config和web.release.config来写一些描述文件,再通过Transformation Engine来转化。
在Transformation Engine 执行下面任务
首先是识别Locator属性是否设置,来判断是否使用XML转换,接着就是从原配置的XML文件中获得相应节点,再从转换的XML文件中招到适合Transform的值相匹配的节点,然后将他们转化到指定的XML配置文件。在转化中主要依赖的是Transform的attribute.
二:实践
基础部分:
要使用XML-Document-Transform engine就要先引用XML-Document-Transform 命名空间,如果在你的Conifg文件中引用这个命名空间,你就能在本Web.config中使用转换描述。
要使用XML-Document-Transform engine就要先引用XML-Document-Transform 命名空间,如果在你的Conifg文件中引用这个命名空间,你就能在本Web.config中使用转换描述。
下面是在web.release.config中使用
接下来是使用Locator,Locator是代表一组表达式,主要是基于 XPath的,通过配置Locator来查找Web.Config.并做相应的事情。
1 :locator属性
下面有个表,来详细列举locator的语法
(1)Match;
这里你需要就是在你直接匹配的属性名。
<add name="Northwind" connectionString="connection string detail"
providerName="System.Data.SqlClient"
xdt:Transform="Replace"
xdt:Locator="Match(name)" />
</connectionStrings>
Engine会再你的Web.config中找到匹配name为Norhwind的就用上面的配置文件图替换。
(2)Condition
基于XPath,在Locator中应用有逻辑性的判断表达式。
<add name="Northwind"
connectionString="connection string detail"
providerName="System.Data.SqlClient"
xdt:Transform="Replace"
xdt:Locator="Condition(@name=’Northwind or @providerName=' System.Data.SqlClient')" />
</connectionStrings>
上面就是Name属性匹配‘Norhwind’的或providerName匹配System.Data.SqlClient的配置文件节点都会被替换。
(3)XPath
这个就是直接写XPath,http://www.w3.org/TR/xpath,这里是XPath的标准
<system.web xdt:Transform="Replace" xdt:Locator="XPath(//system.web)">

</system.web>
<location>
这里你会发现,这里可以写一些列的表达式。
2: Transform 属性
(1) Replace
表示所有匹配的节点都是替换
<add assembly="System.Core, Version=3.5.0.0, Culture=neutral, PublicKeyToken=B77A5C561934E089" />
</assemblies>
其实这里描述文件时web.release.config,将要替换的文件时Web.config .
(2) Remove
删除第一匹配的元素。
</assemblies>
(3)RemoveAll
删除所有匹配的元素
<add xdt:Transform="RemoveAll"/>
</connectionStrings>
(4)Insert
插入从父节点中插入,(authorization中插入<deny users="*" />)
<deny users="*" xdt:Transform="Insert"/>
</authorization>
(5)SetAttributes
直接设置Attributes
batch="false"
xdt:Transform="SetAttributes(batch)">
</compilation>
(6)RemoveAttributes
删除出Attributes
</compilation>
(7)InsertAfter (XPath)
通过匹配 XPath的表达式的,找到节点,并子节点后面插入 XML
<deny users="AName" xdt:Transform="InsertAfter(/configuration/system.web/authorization/ allow[@roles='Admins']") />
</authorization>
(8)InsertBefore (XPath)
通过匹配 XPath的表达式的,找到节点,并子节点前面插入 XML
<allow roles=" Admins" xdt:Transform="InsertBefore(/configuration/system.web/authorization/ deny[@users='*'])" />
</authorization>
(9)XSLT (filePath)
可以在外部定义 XSLT文件,来替换Web.cofig文件。
</appSettings>
实践;
(1)在VS2010中创建一新的asp.web Application项目中,
(2)在configuration 这设置中选中Configuration mannager,新建一个解决方案配置文件,名为Staging,并输入节点原素。
.png)
这里如果你不创建新的Config,你可以使用默认的Web.config.
(3)在Solution Explorer中创建Web.Staging.config 。
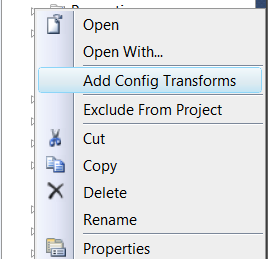
这个就是我之前提到的描述文件,在里面写描述通过XML Docuemnt Transform,官方也成 Transform file.
现在在你的ConnnectStrings中 添加一个ConnectString元素。
<add name="developmentDB" connectionString="Server=DevBox; Database=development; User Id=<user>; password=<password>" providerName="System.Data.SqlClient" />
</connectionStrings>
其中<user>是代表零时的标记。
(4)应用Transform和 Locator属性,当让你首先要引用XML-Document-Transform命名空间,
<add name="personalDB" connectionString="Server=DevBox; Database=personal; User Id=admin; password=PersonalPassword"
providerName="System.Data.SqlClient" xdt:Transform="Replace" xdt:Locator="Match(name)" />
</connectionStrings>
之后,你要在你的Solution Explorer上选择并创建一个Package,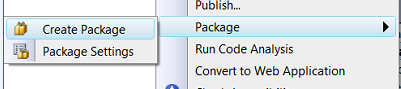
再将包重新使用 VS打开:
这样Tranformation engine就会执行,你就可以向上面基础部分说的那些特性一点一点测试。
(5)关闭使用XML-Document-Tranformation engine,你可以在Staging.config中创建一个<UseTransforms >元素
总结(Summarize)
ASP.NET 4.0中这个特性,主要能帮助大家的应用程序中的配置文件能从Debug平缓的转换到发布配置文件,而所以想的要从开发到产品的发布的转化,这只是其中的一部分,总的看这里主要就写一个描述文件,而描述文件如何和目标文件关联的,就是使用的Transform和Locator这两个属性来控制,再通过XML-Document-Tranformation engine来将他们粘合在一起。
Transform和Locator都做下面这些事情:
Transform :
Replacing a node
Inserting a node
Delete a node
Removing Attributes
Setting Attributes
Locator;
Match on value of a node’s attribute
Exact XPath of where to find a node
A condition match to find a node
最后别忘记, 他们是xdt扩展元素: xdt:Transform
参考
www.msdn.com
http://weblogs.asp.net/gunnarpeipman/archive/2009/06/16/visual-studio-2010-web-config-transforms.aspx
http://weblogs.asp.net/gunnarpeipman/archive/2009/06/16/visual-studio-2010-web-config-transforms.aspx
希望大家能有帮助!请多指点。
worksguo
www.cnblogs.com/worksguo
如对本文有疑问,请提交到交流论坛,广大热心网友会为你解答!! 点击进入论坛