C#/VB.NET中如何将LABEL(标签控件)背景设置为透明
有几种情况:
1.如果LABEL控件未放在其他控件上,如PICTURES控件或其他容器控件中,可以修改LABEL控件的
Backcolor属性-> web-> Transparent
2.如果LABEL控件存在于其他控件中/或放置在其他控件上则上面的方法无效,需按下面的方法操作:
A.在窗体初始事件中添加代码:(这里以PICTURES控件为例)
label.Parent = pictureBox;
label.BackColor = Color.Transparent;
B.也可以在构造函数里添加以下代码:
this.label1.BackColor = Color.FromArgb(0, Color.Transparent);
最近项目中用到需要控件背景透明的功能,但在.Net中子控件只能相对于父控件才能透明,如果控件覆盖在两个或多个其他控件上的时候,就无法达到透明效果。
经过多次验证找到了如下方法,效果如下图:
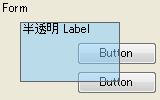
方法一 仅对父控件透明
1. 在控件的构造函数中用SetStyle设定控件支持背景透明,然后将Me.BackColor 设定为 Color.Transparent(透明) 或 Alpha值设定为小于255(半透明)。代码如下:
•VB
Public Sub New()
Me.SetStyle(ControlStyles.SupportsTransparentBackColor, True)
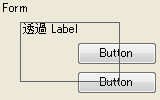
Me.BackColor = Color.Transparent ' 透明
Me.BackColor = Color.FromArgb(100, 255, 255, 255) ' 半透明
End Sub
•C#
public TransparentPictureBox() // {
this.SetStyle(ControlStyles.SupportsTransparentBackColor, true);
this.BackColor = Color.Transparent; // 透明
this.BackColor = Color.FromArgb(100, 255, 255, 255); // 半透明
}
使用该控件时•VB
Me.Label1.Parent = Me.PictureBox1
Me.Label1.Location = New Point(Me.Label1.Left - Me.PictureBox1.Left, Me.Label1.Top - Me.PictureBox1.Top)
•C#
this.label1.Parent = this.pictureBox1;
this.label1.Location = new Point(this.label1.Left - this.pictureBox1.Left, this.label1.Top - this.pictureBox1.Top);
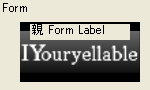
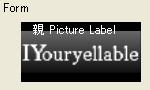
方法二 对所有控件透明
对所有控件透明的方法,就是将要实现透明效果的控件下覆盖的区域绘制成BMP图片,并将图片作为透明控件的背景绘制在透明控件上。
分两步: 1. 绘制父控件 2. 绘制透明控件下覆盖的区域的控件
首先, 重载OnPaintBackground并在该函数中回调Control.InvokePaintBackground 方法和 Control.InvokePaint方法。绘制父控件
protected override void OnPaintBackground(System.Windows.Forms.PaintEventArgs pevent) {
this.DrawParentControl(this.Parent, pevent);
}
private void DrawParentControl(Control c, System.Windows.Forms.PaintEventArgs pevent) {
using (Bitmap bmp = new Bitmap(c.Width, c.Height, System.Drawing.Imaging.PixelFormat.Format32bppArgb)) {
using (Graphics g = Graphics.FromImage(bmp)) {
using (PaintEventArgs p = new PaintEventArgs(g, c.ClientRectangle)) {
this.InvokePaintBackground(c, p);
this.InvokePaint(c, p);
}
}
int offsetX = this.Left + (int)Math.Floor((double)(this.Bounds.Width - this.ClientRectangle.Width) / 2.0);
int offsetY = this.Top + (int)Math.Floor((double)(this.Bounds.Height - this.ClientRectangle.Height) / 2.0);
pevent.Graphics.DrawImage(bmp, this.ClientRectangle, new Rectangle(offsetX, offsetY, this.ClientRectangle.Width, this.ClientRectangle.Height), GraphicsUnit.Pixel);
}
}
而后,根据父控件上放置的各个控件逐个循环绘制背景。
protected override void OnPaintBackground(System.Windows.Forms.PaintEventArgs pevent) {
//
for (int i = this.Parent.Controls.Count - 1; i >= 0; i--) {
Control c = this.Parent.Controls[i];
if (c == this) {
break;
}
if (this.Bounds.IntersectsWith(c.Bounds) == false) {
continue;
}
this.DrawBackControl(c, pevent);
}
}
private void DrawBackControl(Control c, System.Windows.Forms.PaintEventArgs pevent) {
using (Bitmap bmp = new Bitmap(c.Width, c.Height, System.Drawing.Imaging.PixelFormat.Format32bppArgb)) {
c.DrawToBitmap(bmp, new Rectangle(0, 0, c.Width, c.Height));
int offsetX = (c.Left - this.Left) - (int)Math.Floor((double)(this.Bounds.Width - this.ClientRectangle.Width) / 2.0);
int offsetY = (c.Top - this.Top) - (int)Math.Floor((double)(this.Bounds.Height - this.ClientRectangle.Height) / 2.0);
pevent.Graphics.DrawImage(bmp, offsetX, offsetY, c.Width, c.Height);
}
}
如对本文有疑问,请提交到交流论坛,广大热心网友会为你解答!! 点击进入论坛