fetch使用教程整理和XMLHttpRequest的区别
fetch 使用
1. 浏览器支持情况
fetch是相对较新的技术,当然就会存在浏览器兼容性的问题,当前各个浏览器低版本的情况下都是不被支持的,因此为了在所有主流浏览器中使用fetch 需要考虑 fetch 的 polyfill 了
require('es6-promise').polyfill(); require('isomorphic-fetch');12
引入这两个文件,就可以支持主流浏览器了
fetch和XMLHttpRequest
如果看网上的fetch教程,会首先对比XMLHttpRequest和fetch的优劣,然后引出一堆看了很快会忘记的内容(本人记性不好)。因此,我写一篇关于fetch的文章,为了自己看着方便,毕竟工作中用到的也就是一些很基础的点而已。
fetch,说白了,就是XMLHttpRequest的一种替代方案。如果有人问你,除了Ajax获取后台数据之外,还有没有其他的替代方案?
这是你就可以回答,除了XMLHttpRequest对象来获取后台的数据之外,还可以使用一种更优的解决方案fetch。
如何获取fetch
到现在为止,fetch的支持性还不是很好,但是在谷歌浏览器中已经支持了fetch。fetch挂在在BOM中,可以直接在谷歌浏览器中使用。
查看fetch的支持情况:fetch的支持情况
当然,如果不支持fetch也没有问题,可以使用第三方的ployfill来实现只会fetch:whatwg-fetch
fetch的helloworld
下面我们来写第一个fetch获取后端数据的例子:
// 通过fetch获取百度的错误提示页面
fetch('https://www.baidu.com/search/error.html') // 返回一个Promise对象
  .then((res)=>{    return res.text() // res.text()是一个Promise对象
  })
  .then((res)=>{    console.log(res) // res是最终的结果
  })
是不是很简单?可能难的地方就是Promise的写法,这个可以看阮一峰老师的ES6教程来学习。
说明一点,下面演示的GET请求或POST请求,都是采用百度中查询到的一些接口,可能传递的有些参数这个接口并不会解析,但不会影响这个接口的使用。
GET请求
GET请求初步
完成了helloworld,这个时候就要来认识一下GET请求如何处理了。
上面的helloworld中这是使用了第一个参数,其实fetch还可以提供第二个参数,就是用来传递一些初始化的信息。
这里如果要特别指明是GET请求,就要写成下面的形式:
// 通过fetch获取百度的错误提示页面
fetch('https://www.baidu.com/search/error.html', {
   method: 'GET'
 })
 .then((res)=>{    return res.text()
 })
 .then((res)=>{    console.log(res)
 })
GET请求的参数传递
GET请求中如果需要传递参数怎么办?这个时候,只能把参数写在URL上来进行传递了。
// 通过fetch获取百度的错误提示页面
fetch('https://www.baidu.com/search/error.html?a=1&b=2', { // 在URL中写上传递的参数
   method: 'GET'
 })
 .then((res)=>{    return res.text()
 })
 .then((res)=>{    console.log(res)
 })
POST请求
POST请求初步
与GET请求类似,POST请求的指定也是在fetch的第二个参数中:
// 通过fetch获取百度的错误提示页面
fetch('https://www.baidu.com/search/error.html', {
    method: 'POST' // 指定是POST请求
 })
 .then((res)=>{    return res.text()
 })
 .then((res)=>{    console.log(res)
 })
POST请求参数的传递
众所周知,POST请求的参数,一定不能放在URL中,这样做的目的是防止信息泄露。
// 通过fetch获取百度的错误提示页面
fetch('https://www.baidu.com/search/error.html', {
    method: 'POST',
   body: new URLSearchParams([["foo", 1],["bar", 2]]).toString() // 这里是请求对象
 })
 .then((res)=>{    return res.text()
 })
 .then((res)=>{    console.log(res)
 })
其实除了对象URLSearchParams外,还有几个其他的对象,可以参照:常用的几个对象来学习使用。
设置请求的头信息
在POST提交的过程中,一般是表单提交,可是,经过查询,发现默认的提交方式是:Content-Type:text/plain;charset=UTF-8,这个显然是不合理的。下面咱们学习一下,指定头信息:
// 通过fetch获取百度的错误提示页面
fetch('https://www.baidu.com/search/error.html', {
   method: 'POST',
   headers: new Headers({      'Content-Type': 'application/x-www-form-urlencoded' // 指定提交方式为表单提交
   }),
   body: new URLSearchParams([["foo", 1],["bar", 2]]).toString()
 })
 .then((res)=>{    return res.text()
 })
 .then((res)=>{    console.log(res)
 })
这个时候,在谷歌浏览器的Network中查询,会发现,请求方式已经变成了content-type:application/x-www-form-urlencoded。
通过接口得到JSON数据
上面所有的例子中都是返回一个文本,那么除了文本,有没有其他的数据类型呢?肯定是有的,具体查询地址:Body的类型
由于最常用的是JSON数据,那么下面就简单演示一下获取JSON数据的方式:
// 通过fetch获取百度的错误提示页面
fetch('https://www.baidu.com/rec?platform=wise&ms=1&rset=rcmd&word=123&qid=11327900426705455986&rq=123&from=844b&baiduid=A1D0B88941B30028C375C79CE5AC2E5E%3AFG%3D1&tn=&clientWidth=375&t=1506826017369&r=8255', { // 在URL中写上传递的参数
   method: 'GET',
   headers: new Headers({      'Accept': 'application/json' // 通过头指定,获取的数据类型是JSON
   })
 })
 .then((res)=>{    return res.json() // 返回一个Promise,可以解析成JSON
 })
 .then((res)=>{    console.log(res) // 获取JSON数据
 })
强制带Cookie
默认情况下, fetch 不会从服务端发送或接收任何 cookies, 如果站点依赖于维护一个用户会话,则导致未经认证的请求(要发送 cookies,必须发送凭据头).
// 通过fetch获取百度的错误提示页面
fetch('https://www.baidu.com/search/error.html', {
   method: 'GET',
   credentials: 'include' // 强制加入凭据头
 })
 .then((res)=>{    return res.text()
 })
 .then((res)=>{    console.log(res)
 })
简单封装一下fetch
最后了,介绍了一大堆内容,有没有发现,在GET和POST传递参数的方式不同呢?下面咱们就来封装一个简单的fetch,来实现GET请求和POST请求参数的统一。
/**
 * 将对象转成 a=1&b=2的形式
 * @param obj 对象
 */
function obj2String(obj, arr = [], idx = 0) {
  for (let item in obj) {
    arr[idx++] = [item, obj[item]]
  }
  return new URLSearchParams(arr).toString()
}
/**
 * 真正的请求
 * @param url 请求地址
 * @param options 请求参数
 * @param method 请求方式
 */
function commonFetcdh(url, options, method = 'GET') {
  const searchStr = obj2String(options)
  let initObj = {}
  if (method === 'GET') { // 如果是GET请求,拼接url
    url += '?' + searchStr
    initObj = {
      method: method,
      credentials: 'include'
    }
  } else {
    initObj = {
      method: method,
      credentials: 'include',
      headers: new Headers({
        'Accept': 'application/json',
        'Content-Type': 'application/x-www-form-urlencoded'
      }),
      body: searchStr
    }
  }
  fetch(url, initObj).then((res) => {
    return res.json()
  }).then((res) => {
    return res
  })
}
/**
 * GET请求
 * @param url 请求地址
 * @param options 请求参数
 */
function GET(url, options) {
  return commonFetcdh(url, options, 'GET')
}
/**
 * POST请求
 * @param url 请求地址
 * @param options 请求参数
 */
function POST(url, options) {
  return commonFetcdh(url, options, 'POST')
}
GET('https://www.baidu.com/search/error.html', {a:1,b:2})
POST('https://www.baidu.com/search/error.html', {a:1,b:2})API
    fetch(url,{ // url: 请求地址
        method: "GET", // 请求的方法POST/GET等
        headers : { // 请求头(可以是Headers对象,也可是JSON对象)
            'Content-Type': 'application/json',
            'Accept': 'application/json'
        },
        body: , // 请求发送的数据 blob、BufferSource、FormData、URLSearchParams(get或head方法中不能包含body)
        cache : 'default', // 是否缓存这个请求
        credentials : 'same-origin', //要不要携带 cookie 默认不携带 omit、same-origin 或者 include
        mode : "",
        /*
            mode,给请求定义一个模式确保请求有效
            same-origin:只在请求同域中资源时成功,其他请求将被拒绝(同源策略)
            cors : 允许请求同域及返回CORS响应头的域中的资源,通常用作跨域请求来从第三方提供的API获取数据
            cors-with-forced-preflight:在发出实际请求前执行preflight检查
            no-cors : 目前不起作用(默认)
        */
    }).then(resp => {
        /*
            Response 实现了 Body, 可以使用 Body 的 属性和方法:
            resp.type // 包含Response的类型 (例如, basic, cors).
            resp.url // 包含Response的URL.
            resp.status // 状态码
            resp.ok // 表示 Response 的成功还是失败
            resp.headers // 包含此Response所关联的 Headers 对象 可以使用
            resp.clone() // 创建一个Response对象的克隆
            resp.arrayBuffer() // 返回一个被解析为 ArrayBuffer 格式的promise对象
            resp.blob() // 返回一个被解析为 Blob 格式的promise对象
            resp.formData() // 返回一个被解析为 FormData 格式的promise对象
            resp.json() // 返回一个被解析为 Json 格式的promise对象
            resp.text() // 返回一个被解析为 Text 格式的promise对象
        */
        if(resp.status === 200) return resp.json();
        // 注: 这里的 resp.json() 返回值不是 js对象,通过 then 后才会得到 js 对象
        throw New Error ('false of json');
    }).then(json => {
        console.log(json);
    }).catch(error => {
        consolr.log(error);
    })
常用情况
1. 请求 json
   fetch('http://xxx/xxx.json').then(res => {        return res.json();
    }).then(res => {
        console.log(res);
    })
2. 请求文本
   fetch('/xxx/page').then(res => {        return res.text();
    }).then(res => {
        console.log(res);
    })
3. 发送普通 json 数据
   fetch('/xxx', {
        method: 'post',
        body: JSON.stringify({
            username: '',
            password: ''
        })
    });
4. 发送form 表单数据
   var form = document.querySelector('form');
    fetch('/xxx', {
        method: 'post',
        body: new FormData(form)
    });
5. 获取图片
URL.createObjectURL()
   fetch('/xxx').then(res => {        return res.blob();
   }).then(res => {
       document.querySelector('img').src = URL.createObjectURL(imageBlob);
   })
6. 上传
   var file = document.querySelector('.file')    var data = new FormData()
    data.append('file', file.files[0])
    fetch('/xxx', {
      method: 'POST',
      body: data
    })
4. 封装
   require('es6-promise').polyfill();    require('isomorphic-fetch');
    export default function request(method, url, body) {
        method = method.toUpperCase();        if (method === 'GET') {
            body = undefined;
        } else {
            body = body && JSON.stringify(body);
        }        return fetch(url, {
            method,
            headers: {                'Content-Type': 'application/json',                'Accept': 'application/json'
            },
            body
        }).then((res) => {            if (res.status >= 200 && res.status < 300) {                return res;
            } else {                return Promise.reject('请求失败!');
            }
        })
    }
    export const get = path => request('GET', path);
    export const post = (path, body) => request('POST', path, body);
    export const put = (path, body) => request('PUT', path, body);
    export const del = (path, body) => request('DELETE', path, body);
Fetch处理异常
虽然希望Ajax响应成功,但是仍会有问题出现:
可能尝试获取不存在的资源
没有权限获取资源
输入参数有误
服务器抛出异常
服务器超时
服务器崩溃
API更改
...
假设我们试图获取不存在错误,并了解如何处理错误。下面的例子我将chriscoyier拼错为chrissycoyier
// 获取chrissycoyier's repos 而不是 chriscoyier's repos
fetch('https://api.github.com/users/chrissycoyier/repos')为了处理此错误,我们需要使用catch方法。
也许我们会用下面这种方法:
fetch('https://api.github.com/users/chrissycoyier/repos')
  .then(response => response.json())
  .then(data => console.log('data is', data))
  .catch(error => console.log('error is', error));
然而却得到下面这样结果:
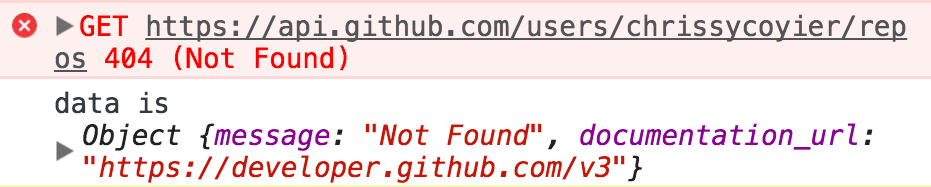
获取失败,但是第二个.then方法会执行。
如果console.log此次响应,会看出不同:
  {  body: ReadableStream
  bodyUsed: true
  headers: Headers
  ok: false // Response is not ok
  redirected: false
  status: 404 // HTTP status is 404.
  statusText: "Not Found" // Request not found
  type: "cors"
  url: "https://api.github.com/users/chrissycoyier/repos"
}大部分是一样的,只有ok、status和statusText是不同的,正如所料,GitHub上没有发现chrissycoyier。
上面响应告诉我们Fetch不会关心AJAX是否成功,他只关心从服务器发送请求和接收响应,如果响应失败我们需要抛出异常。
因此,初始的then方法需要被重写,以至于如果响应成功会调用response.json。最简单方法是检查response是否为ok。
fetch('some-url')
  .then(response => {    if (response.ok) {      return response.json()
    } else {      // Find some way to get to execute .catch()
    }
});一旦我们知道请求是不成功的,我可以throw异常或rejectPromise来调用catch。
// throwing an Errorelse {  throw new Error('something went wrong!')
}// rejecting a Promiseelse {  return Promise.reject('something went wrong!')
}这里选择Promise.reject,是因为容易扩展。抛出异常方法也不错,但是无法扩展,唯一益处在于便于栈跟踪。
所以,到现在代码应该是这样的:
fetch('https://api.github.com/users/chrissycoyier/repos')
  .then(response => {    if (response.ok) {      return response.json()
    } else {      return Promise.reject('something went wrong!')
    }
  })
  .then(data => console.log('data is', data))
  .catch(error => console.log('error is', error));

这样错误就会进入catch语句中。
但是rejectPromise时,只输出字符串不太好。这样不清楚哪里出错了,你肯定也不会想在异常时,输出下面这样:

让我们在看看响应:
  {  body: ReadableStream
  bodyUsed: true
  headers: Headers
  ok: false // Response is not ok
  redirected: false
  status: 404 // HTTP status is 404.
  statusText: "Not Found" // Request not found
  type: "cors"
  url: "https://api.github.com/users/chrissycoyier/repos"
}在这个例子中,我们知道资源是不存在。所以我们可以返回404状态或Not Found原因短语,然而我们就知道如何处理。
为了在.catch中获取status或statusText,我们可以reject一个JavaScript对象:
fetch('some-url')
  .then(response => {    if (response.ok) {      return response.json()
    } else {      return Promise.reject({        status: response.status,        statusText: response.statusText
      })
    }
  })
  .catch(error => {    if (error.status === 404) {      // do something about 404
    }
  })
上面的错误处理方法对于下面这些不需要解释的HTTP状态很适用。
401: Unauthorized
404: Not found
408: Connection timeout
...
但对于下面这些特定的错误不适用:
400:Bad request
例如,如果请求错误缺少必要的参数,就会返回400.
光在catch中告诉状态及原因短语并不足够。我们需要知道缺少什么参数。
所以服务器需要返回一个对象,告诉造成错误请求原因。如果使用Node和Express,会返回像下面这样的响应:
res.status(400).send({  err: 'no first name'
})无法在最初的.then方法中reject,因为错误对象需要response.json来解析。
解决的方法是需要两个then方法。这样可以首先通过response.json读取,然后决定怎么处理。
fetch('some-error')
  .then(handleResponse)function handleResponse(response) {  return response.json()
    .then(json => {      if (response.ok) {        return json
      } else {        return Promise.reject(json)
      }
    })
}首先我们调用response.json读取服务器发来的JSON数据,response.json返回Promise,所以可以链式调用.then方法。
在第一个.then中调用第二个.then,因为我们仍希望通过repsonse.ok判断响应是否成功。
如果想发送状态和原因短语,可以使用Object.assign()将二者结合为一个对象。
let error = Object.assign({}, json, {  status: response.status,  statusText: response.statusText
})return Promise.reject(error)可以使用这样新的handleResponse函数,让数据能自动的进入.then和.catch中。
fetch('some-url')
  .then(handleResponse)
  .then(data => console.log(data))
  .catch(error => console.log(error))
处理其他响应类型
到现在,我们只处理JSON格式的响应,而返回JSON格式数据大约占90%。
至于其他的10%呢?
假设上面的例子返回的是XML格式的响应,也许会收到下面异常:

这是因为XML格式不是JSON格式,我们无法使用response.json,事实上,我们需要response.text,所以我们需要通过判断响应的头部来决定内容格式:
.then(response => {  let contentType = response.headers.get('content-type')  if (contentType.includes('application/json')) {    return response.json()    // ...
  }  else if (contentType.includes('text/html')) {    return response.text()    // ...
  }  else {    // Handle other responses accordingly...
  }
});
当我遇见这种问题时,我尝试使用ExpressJWT处理身份验证,我不知道可以发生JSON响应数据,所以我将XML格式设为默认。
这是我们到现在完整代码:
fetch('some-url')
  .then(handleResponse)
  .then(data => console.log(data))
  .then(error => console.log(error))function handleResponse (response) {  let contentType = response.headers.get('content-type')  if (contentType.includes('application/json')) {    return handleJSONResponse(response)
  } else if (contentType.includes('text/html')) {    return handleTextResponse(response)
  } else {    // Other response types as necessary. I haven't found a need for them yet though.    throw new Error(`Sorry, content-type ${contentType} not supported`)
  }
}function handleJSONResponse (response) {  return response.json()
    .then(json => {      if (response.ok) {        return json
      } else {        return Promise.reject(Object.assign({}, json, {          status: response.status,          statusText: response.statusText
        }))
      }
    })
}function handleTextResponse (response) {  return response.text()
    .then(text => {      if (response.ok) {        return json
      } else {        return Promise.reject({          status: response.status,          statusText: response.statusText,          err: text
        })
      }
    })
}
介绍zlFetch
zlFetch库就是上例中handleResponse函数,所以可以不用生成此函数,不需要担心响应来处理数据和错误。
典型的zlfetch像下面这样:
zlFetch('some-url', options)
  .then(data => console.log(data))
  .catch(error => console.log(error));
使用之前,需要安装zlFetch
npm install zl-fetch --save
接着,需要引入到你的代码中,如果你需要polyfill,确保加入zlFetch之前引入它。
// Polyfills (if needed)require('isomorphic-fetch') // or whatwg-fetch or node-fetch if you prefer// ES6 Importsimport zlFetch from 'zl-fetch';// CommonJS Importsconst zlFetch = require('zl-fetch');zlFetch还能无须转换成JSON格式就能发送JSON数据。
下面两个函数做了同样事情,zlFetch加入Content-type然后将内容转换为JSON格式。
let content = {some: 'content'}// Post request with fetch
fetch('some-url', {  method: 'post',  headers: {'Content-Type': 'application/json'}
  body: JSON.stringify(content)
});// Post request with zlFetch
zlFetch('some-url', {  method: 'post',  body: content
});
zlFetch处理身份认证也很容易。
常用方法是在头部加入Authorization,其值设为Bearer your-token-here。如果你需要增加token选项,zlFetch会帮你创建此域。
所以,下面两种代码是一样的:
let token = 'someToken'
zlFetch('some-url', {  headers: {    Authorization: `Bearer ${token}`
  }
});// Authentication with JSON Web Tokens with zlFetch
zlFetch('some-url', {token});
下面就是使用zlFetch来从GitHub上获取repos:
总结
Fetch是很好的方法,能发送和接收数据。不需要在编写XHR请求或依赖于jQuery。
尽管Fetch很好,但是其错误处理不是很直接。在处理之前,需要让错误信息进入到catch方法中。
使用zlFetch库,就不需要担心错误处理了。
如对本文有疑问,请提交到交流论坛,广大热心网友会为你解答!! 点击进入论坛