Android开发重点:RelativeLayout(相对布局)详解
和线性布局(LinearLayout)一样,RelaiveLayout相对布局也是我们用的比较多的一个布局之一。相对,顾名思义是有参照的,就是以某个兄弟组件,或者父容器来决定的(兄弟组件是在一个同一个布局里面的组件,如果是布局里一个组件参照另一个布局里的组件会出错)。合理地利用好LinearLayout的weight权重属性和RelativeLayout相 对布局,可以解决屏幕分辨率不同的自适应问题。
比如小明在上学的路上,此时他的位置可以用离家多少米或者是离学校多少米表示,就是利用不同的参照物。
好了,废话不多说,直接说比较常用的属性吧~
使用RelativeLayout的话,可能仅仅需要一层就可以完成了,以父容器或者兄弟组件参考+margin +padding就可以设置组件的显示位置,是比较方便的!当然,也不是绝对的,具体问题具体分析吧! 总结就是:尽量使用RelativeLayout + LinearLayout的weight属性搭配使用吧!
设置布局里面所有组件的对其方式:
android:gravity:设置容器内各个子组件的对齐方式
android:ignoreGravity:如果为哪个组件设置了这个属性的话,那么该组件不受gravity属性的影响
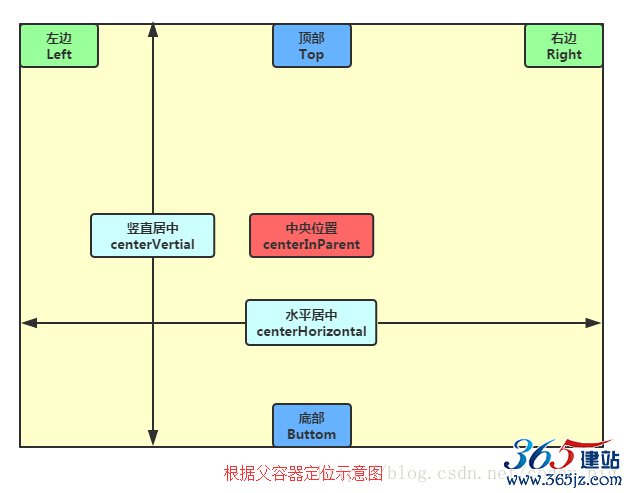
根据父容器来定位:
想位于哪,哪个属性就设置为true
左对齐:android:layout_alighParentLeft
右对齐:android:layout_alighParentRight
顶端对齐:android:layout_alighParentTop
底部对齐:android:layout_alighParentBottom
水平居中:android:layout_centerHorizontal
垂直居中:android:layout_centerVertical
中央位置:android:layout_centerInParent
1.核心属性图

2.父容器定位属性示意图
3.根据兄弟组件定位
恩,先说下什么是兄弟组件吧,所谓的兄弟组件就是处于同一层次容器的组件,如图
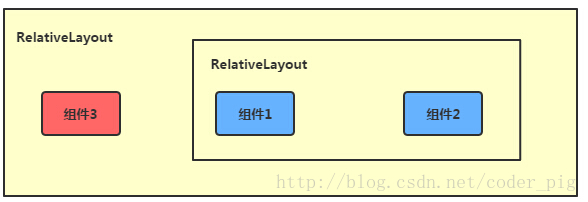
图中的组件1,2就是兄弟组件了,而组件3与组件1或组件2并不是兄弟组件,所以组件3不能通过 组件1或2来进行定位,比如layout_toleftof = "组件1"这样是会报错的!切记! 关于这个兄弟组件定位的最经典例子就是"梅花布局"了,下面代码实现下:
运行效果图:
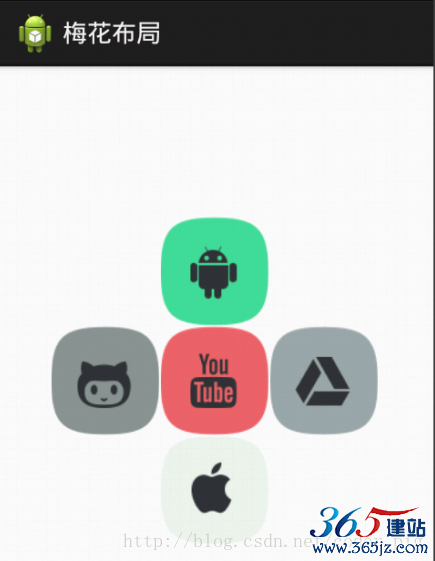
实现代码:
<RelativeLayout xmlns:android="http://schemas.android.com/apk/res/android"
    xmlns:tools="http://schemas.android.com/tools"
    android:id="@+id/RelativeLayout1"
    android:layout_width="match_parent"
    android:layout_height="match_parent" >

    <!-- 这个是在容器中央的 -->

    <ImageView
        android:id="@+id/img1"
        android:layout_width="80dp"
        android:layout_height="80dp"
        android:layout_centerInParent="true"
        android:src="@drawable/pic1"/>

    <!-- 在中间图片的左边 -->
    <ImageView
        android:id="@+id/img2"
        android:layout_width="80dp"
        android:layout_height="80dp"
        android:layout_toLeftOf="@id/img1"
        android:layout_centerVertical="true"
        android:src="@drawable/pic2"/>

    <!-- 在中间图片的右边 -->
    <ImageView
        android:id="@+id/img3"
        android:layout_width="80dp"
        android:layout_height="80dp"
        android:layout_toRightOf="@id/img1"
        android:layout_centerVertical="true"
        android:src="@drawable/pic3"/>

    <!-- 在中间图片的上面-->
    <ImageView
        android:id="@+id/img4"
        android:layout_width="80dp"
        android:layout_height="80dp"
        android:layout_above="@id/img1"
        android:layout_centerHorizontal="true"
        android:src="@drawable/pic4"/>

    <!-- 在中间图片的下面 -->
    <ImageView
        android:id="@+id/img5"
        android:layout_width="80dp"
        android:layout_height="80dp"
        android:layout_below="@id/img1"
        android:layout_centerHorizontal="true"
        android:src="@drawable/pic5"/>

</RelativeLayout>
4.margin与padding的区别
初学者对于这两个属性可能会有一点混淆,这里区分下: 首先margin代表的是偏移,比如marginleft = "5dp"表示组件离容器左边缘偏移5dp; 而padding代表的则是填充,而填充的对象针对的是组件中的元素,比如TextView中的文字 比如为TextView设置paddingleft = "5dp",则是在组件里的元素的左边填充5dp的空间! margin针对的是容器中的组件,而padding针对的是组件中的元素,要区分开来! 下面通过简单的代码演示两者的区别:
比较示例代码如下:
<RelativeLayout xmlns:android="http://schemas.android.com/apk/res/android"
    xmlns:tools="http://schemas.android.com/tools"
    android:layout_width="match_parent"
    android:layout_height="match_parent"
    android:paddingBottom="@dimen/activity_vertical_margin"
    android:paddingLeft="@dimen/activity_horizontal_margin"
    android:paddingRight="@dimen/activity_horizontal_margin"
    android:paddingTop="@dimen/activity_vertical_margin"
    tools:context=".MainActivity" >

    <Button
        android:id="@+id/btn1"
        android:layout_height="wrap_content"
        android:layout_width="wrap_content"
        android:text="Button"/>
    <Button
        android:paddingLeft="100dp"
        android:layout_height="wrap_content"
        android:layout_width="wrap_content"
        android:text="Button"
        android:layout_toRightOf="@id/btn1"/>

    <Button
        android:id="@+id/btn2"
        android:layout_height="wrap_content"
        android:layout_width="wrap_content"
        android:text="Button"
        android:layout_alignParentBottom="true"/>
    <Button
        android:layout_marginLeft="100dp"
        android:layout_height="wrap_content"
        android:layout_width="wrap_content"
        android:text="Button"
        android:layout_toRightOf="@id/btn2"
        android:layout_alignParentBottom="true"/>

</RelativeLayout>
运行效果图比较:

5.很常用的一点:margin可以设置为负数
相信很多朋友都不知道一点吧,平时我们设置margin的时候都习惯了是正数的, 其实是可以用负数的,下面写个简单的程序演示下吧,模拟进入软件后,弹出广告 页面的,右上角的cancle按钮的margin则是使用负数的!
效果图如下:

贴出的广告Activity的布局代码吧,当然,如果你对这个有兴趣的话可以下下demo, 因为仅仅是实现效果,所以代码会有些粗糙!
<RelativeLayout xmlns:android="http://schemas.android.com/apk/res/android"
    xmlns:tools="http://schemas.android.com/tools"
    android:layout_width="match_parent"
    android:layout_height="match_parent"
    tools:context="com.jay.example.relativelayoutdemo.MainActivity"
    android:background="#00CCCCFF">

    <ImageView
        android:id="@+id/imgBack"
        android:layout_width="200dp"
        android:layout_height="200dp"
        android:layout_centerInParent="true"
        android:background="@drawable/myicon" />

    <ImageView
        android:id="@+id/imgCancle"
        android:layout_width="28dp"
        android:layout_height="28dp"
        android:layout_alignRight="@id/imgBack"
        android:layout_alignTop="@id/imgBack"
        android:background="@drawable/cancel"
        android:layout_marginTop="-15dp"
        android:layout_marginRight="-10dp" />

</RelativeLayout>
上一张图~(有点丑......大家凑合看~)

根据兄弟组件来定位(右面的属性值为兄弟组件的id)
左边:android:layout_toLeftOf
右边:android:layout_toRightOf
上方:android:layout_above
下方:android:layout_below
对齐上边界:android:layout_alignTop
对齐下边界:android:layout_alignBottom
对齐左边界:android:layout_alignLeft
对齐右边界:android:layout_alignRight
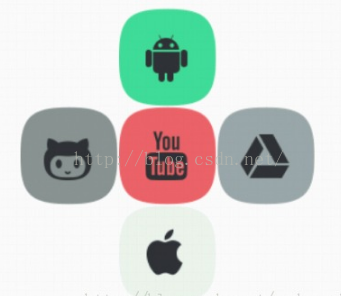
这里演示一个比较典型的例子~
梅花布局:
<RelativeLayout xmlns:android="http://schemas.android.com/apk/res/android"
xmlns:tools="http://schemas.android.com/tools"
android:id="@+id/RelativeLayout1"
android:layout_width="match_parent"
android:layout_height="match_parent" >
<!-- 这个是在容器中央的 -->
<ImageView
android:id="@+id/img1"
android:layout_width="80dp"
android:layout_height="80dp"
android:layout_centerInParent="true"
android:src="@drawable/pic1"
/>
<!-- 在中间图片的左边 -->
<ImageView
android:id="@+id/img2"
android:layout_width="80dp"
android:layout_height="80dp"
android:layout_toLeftOf="@id/img1"
android:layout_centerVertical="true"
android:src="@drawable/pic2"
/>
<!-- 在中间图片的右边 -->
<ImageView
android:id="@+id/img3"
android:layout_width="80dp"
android:layout_height="80dp"
android:layout_toRightOf="@id/img1"
android:layout_centerVertical="true"
android:src="@drawable/pic3"
/>
<!-- 在中间图片的上面-->
<ImageView
android:id="@+id/img4"
android:layout_width="80dp"
android:layout_height="80dp"
android:layout_above="@id/img1"
android:layout_centerHorizontal="true"
android:src="@drawable/pic4"
/>
<!-- 在中间图片的下面 -->
<ImageView
android:id="@+id/img5"
android:layout_width="80dp"
android:layout_height="80dp"
android:layout_below="@id/img1"
android:layout_centerHorizontal="true"
android:src="@drawable/pic5"
/>
</RelativeLayout>
最后还有两个比较常用的Margin和Padding属性!
Margin:设置组件与父容器(通常是布局)的边距
android:layout_margin: 指定控件的四周的外部留出一定的边距
android:layout_marginLeft: 指定控件的左边的外部留出一定的边距
android:layout_marginTop: 指定控件的上边的外部留出一定的边距
android:layout_marginRight: 指定控件的右边的外部留出一定的边距
android:layout_marginBottom: 指定控件的下边的外部留出一定的边距
Padding:设置组件内部元素间的边距(可以理解为填充)
android:padding :指定控件的四周的内部留出一定的边距
android:paddingLeft: 指定控件的左边的内部留出一定的边距
android:paddingTop: 指定控件的上边的内部留出一定的边距
android:paddingRight: 指定控件的右边的内部留出一定的边距
android:paddingBottom: 指定控件的下边的内部留出一定的边距
这两个后面都跟着一个参数,通常用dp作为单位,eg:android:margin = "10dp"
效果图如下:


相关代码:
<RelativeLayout xmlns:android="http://schemas.android.com/apk/res/android"
xmlns:tools="http://schemas.android.com/tools"
android:layout_width="match_parent"
android:layout_height="match_parent"
android:paddingBottom="@dimen/activity_vertical_margin"
android:paddingLeft="@dimen/activity_horizontal_margin"
android:paddingRight="@dimen/activity_horizontal_margin"
android:paddingTop="@dimen/activity_vertical_margin"
tools:context=".MainActivity" >
<Button
android:id="@+id/btn1"
android:layout_height="wrap_content"
android:layout_width="wrap_content"
android:text="Button"
/>
<Button
android:paddingLeft="100dp"
android:layout_height="wrap_content"
android:layout_width="wrap_content"
android:text="Button"
android:layout_toRightOf="@id/btn1"
/>
代码解释:
这个代码很简单,就是写了两个按钮的组合。
第一个组合的第二个按钮设置了paddingleft = "100dp:,结果按钮被拉伸了100dp,因为里面的元素间距填充了100dp;
第二个组合的第二个按钮设置了marginleft = "100dp",结果按钮向右平移了100dp。
总结
RelativeLayout用到的一些重要的属性:
第一类:属性值为true或false
android:layout_centerHrizontal 水平居中
android:layout_centerVertical 垂直居中
android:layout_centerInparent 相对于父元素完全居中
android:layout_alignParentBottom 贴紧父元素的下边缘
android:layout_alignParentLeft 贴紧父元素的左边缘
android:layout_alignParentRight 贴紧父元素的右边缘
android:layout_alignParentTop 贴紧父元素的上边缘
android:layout_alignWithParentIfMissing 如果对应的兄弟元素找不到的话就以父元素做参照物
第二类:属性值必须为id的引用名“@id/id-name”
android:layout_below 在某元素的下方
android:layout_above 在某元素的的上方
android:layout_toLeftOf 在某元素的左边
android:layout_toRightOf 在某元素的右边
android:layout_alignTop 本元素的上边缘和某元素的的上边缘对齐
android:layout_alignLeft 本元素的左边缘和某元素的的左边缘对齐
android:layout_alignBottom 本元素的下边缘和某元素的的下边缘对齐
android:layout_alignRight 本元素的右边缘和某元素的的右边缘对齐
第三类:属性值为具体的像素值,如30dip,40px
android:layout_marginBottom 离某元素底边缘的距离
android:layout_marginLeft 离某元素左边缘的距离
android:layout_marginRight 离某元素右边缘的距离
android:layout_marginTop 离某元素上边缘的距离
EditText的android:hint
设置EditText为空时输入框内的提示信息。
android:gravity
android:gravity属性是对该view 内容的限定.比如一个button 上面的text. 你可以设置该text 在view的靠左,靠右等位置.以button为例,android:gravity="right"则button上面的文字靠右
android:layout_gravity
android:layout_gravity是用来设置该view相对与起父view 的位置.比如一个button 在linearlayout里,你想把该button放在靠左、靠右等位置就可以通过该属性设置.以button为例,android:layout_gravity="right"则button靠右
android:layout_alignParentRight
使当前控件的右端和父控件的右端对齐。这里属性值只能为true或false,默认false。
android:scaleType:
android:scaleType是控制图片如何resized/moved来匹对ImageView的size。
ImageView.ScaleType / android:scaleType值的意义区别:
CENTER /Center/?.jpg 按图片的原来size居中显示,当图片长/宽超过View的长/宽,则截取图片的居中部分显示;
CENTER_CROP / centerCrop 按比例扩大图片的size居中显示,使得图片长(宽)等于或大于View的长(宽);
CENTER_INSIDE / centerInside 将图片的内容完整居中显示,通过按比例缩小或原来的size使得图片长/宽等于或小于View的长/宽;
FIT_CENTER / fitCenter 把图片按比例扩大/缩小到View的宽度,居中显示;
FIT_END / fitEnd 把图片按比例扩大/缩小到View的宽度,显示在View的下部分位置;
FIT_START / fitStart 把图片按比例扩大/缩小到View的宽度,显示在View的上部分位置;
FIT_XY / fitXY 把图片不按比例扩大/缩小到View的大小显示;
MATRIX / matrix 用矩阵来绘制,动态缩小放大图片来显示。
要注意一点,Drawable文件夹里面的图片命名是不能大写的。
LinearLayout和RelativeLayout 比较
LinearLayout和RelativeLayout
共有属性:
java代码中通过btn1关联次控件
android:id="@+id/btn1"
控件宽度
android:layout_width="80px" //"80dip"或"80dp"
android:layout_width =“wrap_content”
android:layout_width =“match_parent”
控件高度
android:layout_height="80px" //"80dip"或"80dp"
android:layout_height =“wrap_content”
android:layout_height =“match_parent”
控件排布
android:orientation="horizontal”
android:orientation="vertical“
控件间距
android:layout_marginLeft="5dip" //距离左边
android:layout_marginRight="5dip" //距离右边
android:layout_marginTop="5dip" //距离上面
android:layout_marginRight="5dip" //距离下面
android:paddingLeft="5dip"
控件显示位置
android:gravity="center" //left,right, top, bottom
android:gravity="center_horizontal"
android:layout_gravity是本元素对父元素的重力方向。
android:layout_gravity属性则设置控件本身相对于父控件的显示位置
android:gravity是本元素所有子元素的重力方向。
android:layout_gravity="center_vertical"
android:layout_gravity="left"
android:layout_gravity="left|bottom"
TextView中文本字体
android:text="@String/text1" //在string.xml中定义text1的值
android:textSize="20sp"
android:textColor=”#ff123456”
android:textStyle="bold" //普通(normal), 斜体(italic),粗斜体(bold_italic)
TextView中,控制其以...结束
android:ellipsize="end"
只有一行
android:singleLine="true"
定义控件是否可见
android:visibility=”visible” //可见
android:visibility=”invisible” //不可见,但是在布局中占用的位置还在
android:visibility=”gone” //不可见,完全从布局中消失
定义背景图片
android:background="@drawable/img_bg" //img_bg为drawable下的一张图片
seekbar控件背景图片及最大值
android:progressDrawable="@drawable/seekbar_img"
android:thumb="@drawable/thumb"
android:max = "60"
android:layout_alignWithParentIfMissing="true"
仅在RelativeLayout中有效:
在父亲布局的相对位置
android:layout_alignParentLeft="true" //在布局左边
android:layout_alignParentRight="true" //在布局右边
android:layout_alignParentTop="true" //在布局上面
android:layout_alignParentBottom="true " //在布局的下面
在某个控件的相对位置
android:layout_toRightOf="@id/button1" //在控件button1的右边,不仅仅是紧靠着
android:layout_toLeftOf="@id/button1" //在控件button2的左边,不仅仅是紧靠着
android:layout_below="@id/button1 " //在控件button1下面,不仅仅是正下方
android:layout_above=“@id/button1” //在控件button1下面,不仅仅是正下方
定义和某控件对奇
android:layout_alignTop=”@id/button1” //和控件button1上对齐
android:layout_alignBottom=”@id/button1” //和控件button1下对齐
android:layout_alignLeft=”@id/button1” //和控件button1左对齐
android:layout_alignRight=”@id/button1” //和控件button2右对齐
android:layout_centerHorizontal="true" //水平居中
android:layout_centerVertical="true"
android:layout_centerInParent="true"
仅在LinearLayout中有效
设置控件在一排或一列中所占比例值
android:layout_weight="1"
如对本文有疑问,请提交到交流论坛,广大热心网友会为你解答!! 点击进入论坛